背景 链接到标题
在日常开发时,有时候需要保证自己代码的健壮性,需要模拟各种故障测试,比如:磁盘、网络、端口等,今天来汇总一下平时使用最多的几种故障模拟方法
磁盘 链接到标题
插入拔出 链接到标题
服务器的存储控制器如果是直通模式,那么在 OS 中能够直接获取到磁盘插入与拔出事件,有时候我们需要检测到相应的事件来自动化的做某些动作,具体的实现方式见之前的文章 Linux 下磁盘设备自动发现方式 。
那么我们写完了代码想要测试,不想去机房物理操作,怎么模拟呢?
Hypervisor 链接到标题
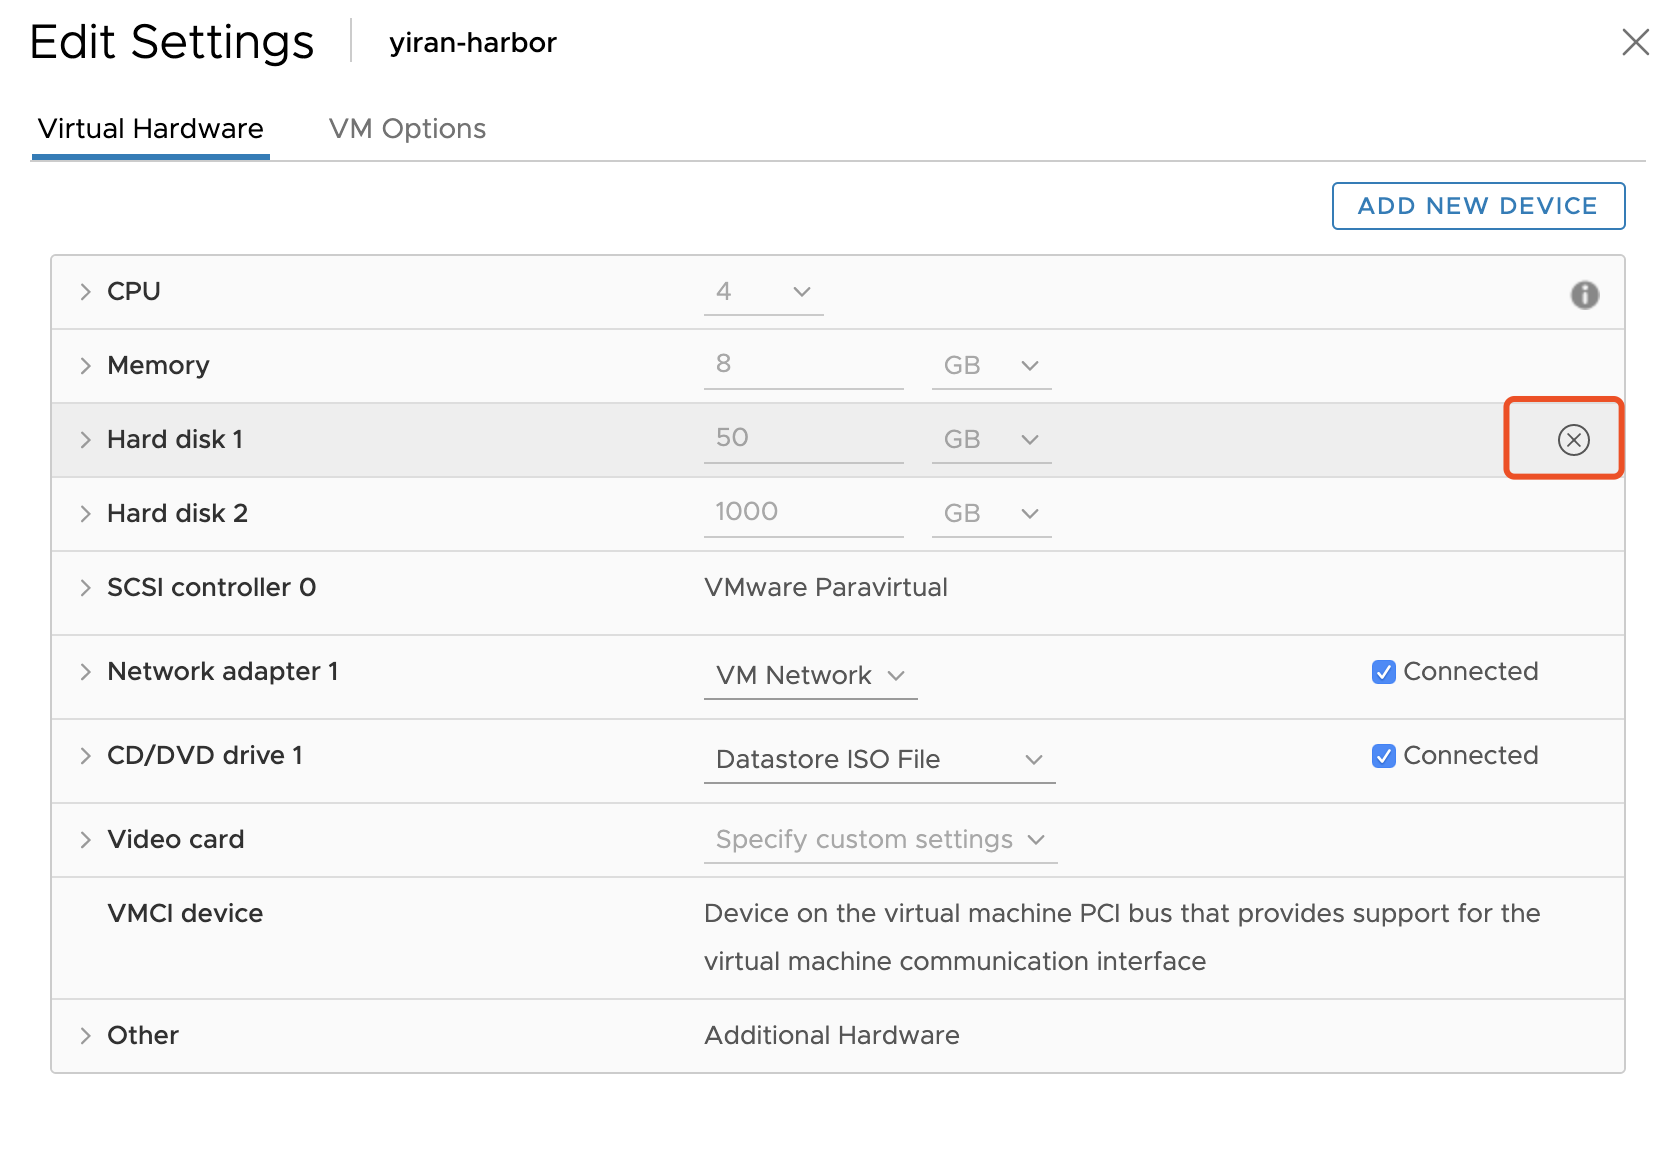
如果你的代码部署的机器是一台虚拟机,那么在 Hypervisor 层面一般都会有对应的接口来完成相应的操作。
比如 Vsphere ESXi 中可以直接编辑虚拟机,在磁盘选项中有一个“移除”按钮,可以直接移除磁盘:
再比如 KVM 下,可以通过 Libvirt 接口来 detach 磁盘。
当然对于插入动作,Hypervisor 也会提供对应的功能。
物理服务器 链接到标题
如果 OS 不是在 Hypervisor 上,而是直接安装在了物理服务器上,我们怎么做呢?
通常我们服务器上的磁盘都是 SCSI 设备,会实现完整的 SCSI(接口),可以通过修改相应设备的标置文件来达到目的。
示例:
节点存在设备 /dev/sda ,修改标置文件,在系统中会发现磁盘已经被移除了。
[root@yiran ~]# lsblk
NAME            MAJ:MIN RM  SIZE RO TYPE MOUNTPOINT
sda               8:0    0   10G  0 disk
sr0              11:0    1  4.3G  0 rom  /run/media/root/CentOS 7 x86_64
vda             252:0    0  100G  0 disk
├─vda1          252:1    0    1G  0 part /boot
└─vda2          252:2    0   99G  0 part
  ├─centos-root 253:0    0   50G  0 lvm  /
  ├─centos-swap 253:1    0  3.9G  0 lvm
  └─centos-home 253:2    0 45.1G  0 lvm  /home
[root@yiran ~]# ls /sys/block/sda/device/delete
/sys/block/sda/device/delete
[root@yiran ~]# echo 1 > /sys/block/sda/device/delete
[root@yiran ~]# lsblk
NAME            MAJ:MIN RM  SIZE RO TYPE MOUNTPOINT
sr0              11:0    1  4.3G  0 rom  /run/media/root/CentOS 7 x86_64
vda             252:0    0  100G  0 disk
├─vda1          252:1    0    1G  0 part /boot
└─vda2          252:2    0   99G  0 part
  ├─centos-root 253:0    0   50G  0 lvm  /
  ├─centos-swap 253:1    0  3.9G  0 lvm
  └─centos-home 253:2    0 45.1G  0 lvm  /home
如果我们新开一个终端,可以通过 udevadm 命令查看到设备移除过程:
[root@yiran ~]# udevadm monitor
monitor will print the received events for:
UDEV - the event which udev sends out after rule processing
KERNEL - the kernel uevent

KERNEL[1255.635671] remove   /devices/pci0000:00/0000:00:07.0/virtio3/host2/target2:0:0/2:0:0:0/bsg/2:0:0:0 (bsg)
KERNEL[1255.636247] remove   /devices/pci0000:00/0000:00:07.0/virtio3/host2/target2:0:0/2:0:0:0/scsi_generic/sg1 (scsi_generic)
KERNEL[1255.636265] remove   /devices/pci0000:00/0000:00:07.0/virtio3/host2/target2:0:0/2:0:0:0/scsi_device/2:0:0:0 (scsi_device)
KERNEL[1255.636357] remove   /devices/pci0000:00/0000:00:07.0/virtio3/host2/target2:0:0/2:0:0:0/scsi_disk/2:0:0:0 (scsi_disk)
UDEV  [1255.637109] remove   /devices/pci0000:00/0000:00:07.0/virtio3/host2/target2:0:0/2:0:0:0/bsg/2:0:0:0 (bsg)
KERNEL[1255.638351] remove   /devices/virtual/bdi/8:0 (bdi)
UDEV  [1255.638369] remove   /devices/pci0000:00/0000:00:07.0/virtio3/host2/target2:0:0/2:0:0:0/scsi_device/2:0:0:0 (scsi_device)
KERNEL[1255.638385] remove   /devices/pci0000:00/0000:00:07.0/virtio3/host2/target2:0:0/2:0:0:0/block/sda (block)
UDEV  [1255.638397] remove   /devices/pci0000:00/0000:00:07.0/virtio3/host2/target2:0:0/2:0:0:0/scsi_disk/2:0:0:0 (scsi_disk)
KERNEL[1255.638417] remove   /devices/pci0000:00/0000:00:07.0/virtio3/host2/target2:0:0/2:0:0:0 (scsi)
UDEV  [1255.639174] remove   /devices/pci0000:00/0000:00:07.0/virtio3/host2/target2:0:0/2:0:0:0/scsi_generic/sg1 (scsi_generic)
UDEV  [1255.639192] remove   /devices/virtual/bdi/8:0 (bdi)
UDEV  [1255.641850] remove   /devices/pci0000:00/0000:00:07.0/virtio3/host2/target2:0:0/2:0:0:0/block/sda (block)
UDEV  [1255.642914] remove   /devices/pci0000:00/0000:00:07.0/virtio3/host2/target2:0:0/2:0:0:0 (scsi)
KERNEL[1255.643143] remove   /devices/pci0000:00/0000:00:07.0/virtio3/host2/target2:0:0 (scsi)
UDEV  [1255.643608] remove   /devices/pci0000:00/0000:00:07.0/virtio3/host2/target2:0:0 (scsi)
说完了拔出磁盘,那么该如何插入呢?最简单的办法肯定是重启 OS,毕竟我们不是真正的拔出了设备,重启 OS 之后设备肯定会重新发现。我们也可以通过修改对应的标置文件来手动重新执行设备扫描动作:
[root@yiran ~]# lsblk
NAME            MAJ:MIN RM  SIZE RO TYPE MOUNTPOINT
sr0              11:0    1  4.3G  0 rom  /run/media/root/CentOS 7 x86_64
vda             252:0    0  100G  0 disk
├─vda1          252:1    0    1G  0 part /boot
└─vda2          252:2    0   99G  0 part
  ├─centos-root 253:0    0   50G  0 lvm  /
  ├─centos-swap 253:1    0  3.9G  0 lvm
  └─centos-home 253:2    0 45.1G  0 lvm  /home
[root@yiran ~]# for i in `ls /sys/class/scsi_host/`;do echo "- - -" > /sys/class/scsi_host/$i/scan;done
[root@yiran ~]# lsblk
NAME            MAJ:MIN RM  SIZE RO TYPE MOUNTPOINT
sda               8:0    0   10G  0 disk
sr0              11:0    1  4.3G  0 rom  /run/media/root/CentOS 7 x86_64
vda             252:0    0  100G  0 disk
├─vda1          252:1    0    1G  0 part /boot
└─vda2          252:2    0   99G  0 part
  ├─centos-root 253:0    0   50G  0 lvm  /
  ├─centos-swap 253:1    0  3.9G  0 lvm
  └─centos-home 253:2    0 45.1G  0 lvm  /home
同样,在另一个终端可以看到 udev 事件:
[root@yiran ~]# udevadm monitor
monitor will print the received events for:
UDEV - the event which udev sends out after rule processing
KERNEL - the kernel uevent

KERNEL[1506.675351] add      /devices/pci0000:00/0000:00:07.0/virtio3/host2/target2:0:0 (scsi)
KERNEL[1506.675416] add      /devices/pci0000:00/0000:00:07.0/virtio3/host2/target2:0:0/2:0:0:0 (scsi)
KERNEL[1506.675523] add      /devices/pci0000:00/0000:00:07.0/virtio3/host2/target2:0:0/2:0:0:0/scsi_disk/2:0:0:0 (scsi_disk)
KERNEL[1506.675562] add      /devices/pci0000:00/0000:00:07.0/virtio3/host2/target2:0:0/2:0:0:0/scsi_device/2:0:0:0 (scsi_device)
KERNEL[1506.676417] add      /devices/pci0000:00/0000:00:07.0/virtio3/host2/target2:0:0/2:0:0:0/scsi_generic/sg1 (scsi_generic)
KERNEL[1506.676555] add      /devices/pci0000:00/0000:00:07.0/virtio3/host2/target2:0:0/2:0:0:0/bsg/2:0:0:0 (bsg)
UDEV  [1506.677524] add      /devices/pci0000:00/0000:00:07.0/virtio3/host2/target2:0:0 (scsi)
KERNEL[1506.677662] add      /devices/virtual/bdi/8:0 (bdi)
UDEV  [1506.682939] add      /devices/virtual/bdi/8:0 (bdi)
KERNEL[1506.682968] add      /devices/pci0000:00/0000:00:07.0/virtio3/host2/target2:0:0/2:0:0:0/block/sda (block)
UDEV  [1506.683015] add      /devices/pci0000:00/0000:00:07.0/virtio3/host2/target2:0:0/2:0:0:0 (scsi)
UDEV  [1506.683036] add      /devices/pci0000:00/0000:00:07.0/virtio3/host2/target2:0:0/2:0:0:0/scsi_disk/2:0:0:0 (scsi_disk)
UDEV  [1506.683053] add      /devices/pci0000:00/0000:00:07.0/virtio3/host2/target2:0:0/2:0:0:0/scsi_device/2:0:0:0 (scsi_device)
UDEV  [1506.689442] add      /devices/pci0000:00/0000:00:07.0/virtio3/host2/target2:0:0/2:0:0:0/scsi_generic/sg1 (scsi_generic)
UDEV  [1506.690861] add      /devices/pci0000:00/0000:00:07.0/virtio3/host2/target2:0:0/2:0:0:0/bsg/2:0:0:0 (bsg)
UDEV  [1506.711146] add      /devices/pci0000:00/0000:00:07.0/virtio3/host2/target2:0:0/2:0:0:0/block/sda (block)
延迟 链接到标题
为了测试软件在高 IO 延迟下的表现,现在我们需要给一块磁盘设置指定的 IO 延迟(latency),可以使用 dm-delay 来实现:
dm-delay具体参数为:<device> <offset> <delay> [<write_device> <write_offset> <write_delay>]
[root@node90 10:45:54 ~]$modprobe brd rd_nr=1 rd_size=10485760 # 创建10G ram disk
[root@node90 10:46:23 ~]$blockdev --getsize /dev/ram0
20971520
[root@node90 10:46:23 ~]$size=$(blockdev --getsize /dev/ram0) # Size in 512-bytes sectors
[root@node90 10:46:23 ~]$echo "0 $size delay /dev/ram0 0 500" | dmsetup create delayed # 设置读延迟 500
[root@node90 10:45:54 ~]cat fio.conf
[random]
filename=/dev/dm-0
readwrite=randread
blocksize=4k
ioengine=sync
direct=1
time_based=1
runtime=10
[root@node90 10:45:54 ~]fio fio.conf
...
clat (usec): min=500769, max=502110, avg=501122.35, stdev=357.23 #写入延迟 500ms
     lat (usec): min=500770, max=502111, avg=501123.45, stdev=357.20
...
通过 dm-delay,我们可以来进行各种排列组合来模拟磁盘状态,如:读延迟高,写延迟正常;读延迟高,写延迟高;读延迟低,写延迟高等。
IO 中断 链接到标题
dm-delay 支持设置 IO 中断,具体命令为:
$ sudo dmsetup suspend /dev/dm-0
$ sudo dmsetup resume  /dev/dm-0
若在执行 fio 过程中设置 IO 中断, 会看到 iops 为0 的现象:
[root@node90 10:45:54 ~]fio fio.conf
Starting 1 process
Jobs: 1 (f=1): [r(1)] [0.0% done] [0KB/0KB/0KB /s] [0/0/0 iops] [eta 34d:09h:15m:48s]
IO Error 链接到标题
有时我们也要求验证磁盘突然出现 IO Error 情况,可以通过 dm-flakey 实现:
[root@node90 11:06:44 ~]$modprobe brd rd_nr=1 rd_size=10485760 #10G
[root@node90 11:06:58 ~]$size=$(blockdev --getsize /dev/ram0)
[root@node90 11:06:58 ~]$echo "0 $size flakey /dev/ram0 0 60 0" | dmsetup create flakey
[root@node90 11:06:59 ~]$size=$(blockdev --getsize /dev/ram0)
[root@node90 11:07:06 ~]$echo "0 $size flakey /dev/ram0 0 30 30"  | dmsetup reload flakey
[root@node90 11:07:06 ~]$dmsetup resume flakey
[root@node90 11:07:06 ~]$dmsetup table flakey
0 20971520 flakey 1:0 0 30 30 0
若在执行 fio 过程中设置 IO Error,则会看到以下错误:
[root@node90 10:45:54 ~]fio fio.conf
Starting 1 process
fio: io_u error on file /dev/dm-0: Input/output error: read offset=647606272, buflen=4096
fio: pid=24184, err=5/file:io_u.c:1708, func=io_u error, error=Input/output error

random: (groupid=0, jobs=1): err= 5 (file:io_u.c:1708, func=io_u error, error=Input/output error): pid=24184: Sat Aug 31 11:09:45 2019
  cpu          : usr=0.00%, sys=0.00%, ctx=0, majf=0, minf=69
...
网络 链接到标题
在故障场景中,最常见的应该就是网络故障,尤其是现在分布式应用的场景很多,另一点原因是网络相关的工具很多,可以很方便的使用。
故障 链接到标题
最简单的网络故障应该就是连接中断,也就是各个节点之间无法联通了,我们可以直接通过 ifdown <nic name> 来将网卡置为 down,或者如果不在意其他网卡状态的话,可以直接 systemctl stop network 停止网络服务,来模拟无法联通情况。
有时候我们不想模拟网卡故障,想要模拟固定节点之间的网络故障,那么可以通过 iptables 来实现:
iptables -I INPUT -s 172.11.30.14 -j DROP
iptables -I OUTPUT -d 172.11.30.14 -j DROP
将指定 IP 的所有连接都丢弃。
延迟 链接到标题
网络延迟模拟可以通过 tc 来实现,命令很简单,找到指定的网卡名称,并执行:
[root@yiran ~]# tc qdisc add dev eth0 root netem delay 8ms
新开终端,在其他节点 ping 设置了网络延迟的节点:
root@yiran-30-250:~
 $ ping 192.168.30.246
PING 192.168.30.246 (192.168.30.246) 56(84) bytes of data.
64 bytes from 192.168.30.246: icmp_seq=1 ttl=64 time=8.76 ms
64 bytes from 192.168.30.246: icmp_seq=2 ttl=64 time=8.40 ms
64 bytes from 192.168.30.246: icmp_seq=3 ttl=64 time=8.38 ms
64 bytes from 192.168.30.246: icmp_seq=4 ttl=64 time=8.38 ms
^C
--- 192.168.30.246 ping statistics ---
4 packets transmitted, 4 received, 0% packet loss, time 3005ms
rtt min/avg/max/mdev = 8.381/8.485/8.769/0.198 ms
可以看到延迟稳定在 8ms 左右。
除了 tc 工具外,前几天看到了一个 Golang 实现的 L4 网络代理项目,可以模拟延迟和丢包,具体关于故障模拟的代码如下:
func (t *TCPServer) doWrite(bytes []byte, conn goetty.IOSession, ctl *conf.CtlUnit) {
	if ctl.DelayMs > 0 {
		log.Infof("Delay <%d>ms write to <%s>", ctl.DelayMs, t.proxyUnit.Target)
		time.Sleep(time.Millisecond * time.Duration(ctl.DelayMs))
	}

	conn.WriteAndFlush(bytes)
}
for {
		_, err = session.Read()
		if err != nil {
			log.Infof("Read from client<%s> failure.err=%+v", session.RemoteAddr(), err)
			break
		} else {
			// write to target
			ctl := t.proxyUnit.Ctl
			bytes := in.RawBuf()[in.GetReaderIndex():in.GetWriteIndex()]
			if 0 == ctl.Out.LossRate {
				log.Debugf("write %d bytes to <%s>", len(bytes), conn.RemoteAddr())
				t.doWrite(bytes, conn, ctl.Out)
			} else {
				if t.rnd.Intn(100) > ctl.Out.LossRate {
					log.Debugf("write %d bytes to <%s>", len(bytes), conn.RemoteAddr())
					t.doWrite(bytes, conn, ctl.Out)
				} else {
					log.Debugf("Loss write %d bytes to <%s>", len(bytes), conn.RemoteAddr())
				}
			}
		}

		in.SetReaderIndex(in.GetWriteIndex())
    }
端口 链接到标题
占用 链接到标题
在使用 Zookeeper 这类有状态应用时,除了通过 service 是否处于 running 来判断服务是否运行外,还需要判断节点的 zk 角色是否符合预期,如 leader 或 follower。
前几天又一个场景需要造出 Zookeeper 处于运行中,但是角色状态处于异常状态,我通过 nc 来实现的:
[root@yiran ~]# nc -kl 2181
现将端口占用,然后启动 Zookeeper,就可以了。
总结 链接到标题
故障模拟的主要使用场景是产品的自动化测试中,平时主要是辅助开发来自测,不需要记住具体参数,但是最好了解到什么场景下有什么工具可以使用,省时省力。
参考链接 链接到标题
- https://access.redhat.com/documentation/en-us/red_hat_enterprise_linux/6/html/virtualization_administration_guide/sect-managing_guest_virtual_machines_with_virsh-attaching_and_updating_a_device_with_virsh
- https://www.enodev.fr/posts/emulate-a-slow-block-device-with-dm-delay.html
- https://www.kernel.org/doc/Documentation/device-mapper/dm-flakey.txt
- https://github.com/fagongzi/netproxy